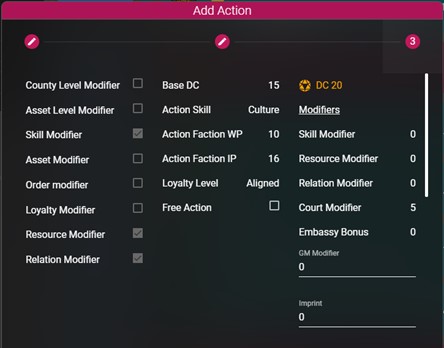
The third step of the action creation popup window displays a lot of information and allows the Game Master to register all the modifiers that should be applied to the acting faction’s roll.
The first section is divided into three columns.
On the left, a list of standard action modifiers and whether they apply or not to the selected action type.
In the center, some general information:
- The base DC of the action
- The type of skill bonus that will be applied
- The current number of WP/IP of the acting faction
- The loyalty level of the selected county towards the acting cation
- A “Free” checkbox indicating if this is a free action or not
Only the “Free” checkbox can be updated by the GM.
On the right side, a summary of the final DC and the modifiers that were applied. Some of the modifiers will get updated as the rest of the information in step 3 is updated by the GM.
The GM is free to add the “GM Modifier” to increase or lower the difficulty of any roll, independently from what the rulebook says. In the end, the GM always decides how difficult the action is.
If the faction has Imprint points, those can also be spent to lower the DC.

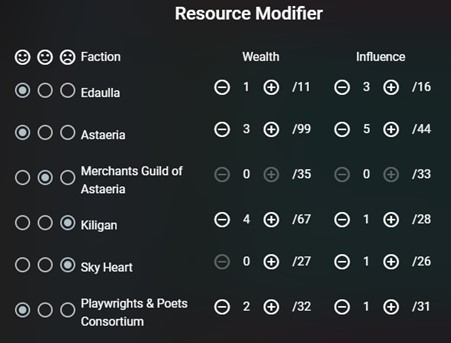
Some actions allow factions to spend resources, WP and/or IP, to influence the DC of an action. The resource modifier table allows the GM to specify which factions are supporting the action (happy smiley), and which factions are trying to prevent it (sad smiley).
Resources spent will be automatically removed from the factions’ resource pool once the action is saved, and will be automatically reimbursed should the action be deleted by the GM.

Likewise, some actions allow the factions controlling Order assets in the county to support or try to prevent the action.

Finally, some actions allow the factions controlling assets of a particular type in the county to support or try to prevent the action.

When everything has been filled in, you may click on the d20 at the bottom of the window to roll the dice. You can re-roll as many times as you want or edit the result using the numeric steppers.
When you’re done, click on the “Save” button to save the action. The action will then appear on the Timeline, in chronological order.

